“It’s not hard to tell when you worked last” stated a fellow conductor.
“How can you tell?”
“The heaters are on high.”
“Yeah. It’s cold from those drafty doors and windows. Don’t you feel them drafts?”
“Not really. I keep the heaters on low and it feels fine.”
Not all locomotive cabs are warm in 15 degree temperatures. Some have drafty windows and doors or heaters that produce luke warm air. The little heat that is created escapes into the cold metals that make up the cab due to the lack of insulation. It does not help that the conductor is constantly in and out of the cab since this is mostly a local switching operation. Usually when the conductor comes back into the cab from his ground duty exercises for a few minutes, the heaters goes from high to low. Since doors and windows are being opened and closed a lot, duck tape is a worthless tool to block the draft from the doors.
Most of the locomotives models (SW1500 has one blower heater) I’ve been in have two wall heaters and two forced air heaters. One set of heaters are located on the engineer side and the other set is on the fireman’s side. The sidewalls heaters provide a cushion of warm air maybe halfway up the side cab windows and the forced air heaters spreads heat around in the cab. Depending on which heaters are on, various heating temperatures can be achieved. Sidewall heaters working without the blower heaters will never be able heat the cab alone. One blower heater with both sidewalls will produce a luke warm draft around in the cab. If all heaters are on high, a warm draft will be generated in the cab. But as soon as it starts to get warms, I have to leave the cab to either drop a cut or throw a switch.
Hopefully soon, Old Man Winter will retire for the season……
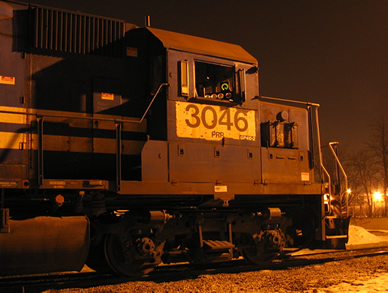
NS GP40-2 3046
Saturday, February 20, 2010

Sunday, January 24, 2010
Adhesion Part II
In my posting “Let’s have some fun” http://clevelandtrains.blogspot.com/2009/10/now-lets-have-some-fun.html traction effort and adhesion is mentioned briefly. Adhesion and traction effort is what it takes to get tonnage moving over grades, but there are wheel slip control systems to maximize both. Some of the wheel slip systems out there are EMD’s EM2000 and Super Series, Wabtec Q-Tron, GE BrightStar and ZTR BOA/Nexsys II. These microprocessor systems can also monitor the health of traction motors, engine, blowers, alternator, water temperature and air compressor to just name a few components.
In order to maximize traction effort and adhesion during heavy tonnage situations and or wet rail conditions, the wheel slip systems works to reduce the wheels from slipping when below 1.5 mph. This allows starting the train smoothly and not breaking a knuckle or pulling a drawbar. The system controls slippage by reducing power to traction motors (or excitation from the generator on older DC-DC locomotives). Reducing power on the slipping traction motor(s) allows them to establish a footing or bite on the rail to get moving. Above 1.5mph, the wheel slip system turns in a creep control system. Creep control allows each traction motor to develop maximum traction effort by rotating 1-2mph faster than ground speed. The wheel is allowed to spin for a few seconds until it grips the rail. Once it finds a grip after this higher speed rotation, it is at the maximum adhesion point. Wheel creep can happen at any speed and is controlled by the wheel slip system. There is a high pitched sound, similar to wheel slippage, when a wheel is creeping.
Somewhere, I have a short video of a GP38-2 creeping to share.
Thursday, December 10, 2009
Conjuction Juction
How could you not love the old Schoolhouse Rock cartoons. My favorite just happen to be Conjunction Junction(I wonder why....). I'm glad that I don't have to switch in yard like the one in Conjunction Junction.
Tuesday, October 27, 2009
Amtrak's Private Rail Car Standards
Since my first train ride on Amtrak's Capitol Limited during the summer of 1993, I've been in love with stainless steel rail passenger cars. I remember very clearly the consist: a dome car, heritage diner, lounge, sleepers and Amfleet coaches. Over the years, Amtrak has sold off most if not all of its heritage fleet. Some of these cars made it into the hands other railroads, historical rail groups and private owners. Some private owner’s cars are still running, others are now static displays. Not all private car owners picked up their cars from Amtrak. Some were lucky to pick them up when railroads or the Pullman Company started selling their passenger equipment.
Some of the cars in private ownership are Amtrak compatible. To achieve that status, the car must have the following:
Amtrak PC1 - Annual Amtrak car inspection. Must be signed off by PC1 or PC2 approved Amtrak inspector.
Amtrak PC1a - Car Data
Amtrak PC2 - 40 year rebuild of trucks. Must be signed off by a PC2 approved Amtrak inspector.
Amtrak PC3 - Route/Mileage Log
Amtrak PC4 - Shop report. This must be a complete report of mechanical, electrical, and structure upgrades/repairs. Be ready to take pictures, have drawings made to document upgrades/repairs.
Amtrak PC5 - Car Clearance data.
Sound simple? These standards are just the tip of the iceberg. Performing work on a car and meeting Amtrak standards requires a lot of time, money and equipment. Depending on the car you pick up, you might need a few minor things done that will take 6 months or 10 years to complete. Some cars are restored to the way they came out of the factory while others are turned in modern plush pimp rides.
More to come on this subject.
Some of the cars in private ownership are Amtrak compatible. To achieve that status, the car must have the following:
Amtrak PC1 - Annual Amtrak car inspection. Must be signed off by PC1 or PC2 approved Amtrak inspector.
Amtrak PC1a - Car Data
Amtrak PC2 - 40 year rebuild of trucks. Must be signed off by a PC2 approved Amtrak inspector.
Amtrak PC3 - Route/Mileage Log
Amtrak PC4 - Shop report. This must be a complete report of mechanical, electrical, and structure upgrades/repairs. Be ready to take pictures, have drawings made to document upgrades/repairs.
Amtrak PC5 - Car Clearance data.
Sound simple? These standards are just the tip of the iceberg. Performing work on a car and meeting Amtrak standards requires a lot of time, money and equipment. Depending on the car you pick up, you might need a few minor things done that will take 6 months or 10 years to complete. Some cars are restored to the way they came out of the factory while others are turned in modern plush pimp rides.
More to come on this subject.
Sunday, October 25, 2009
“Now let’s have some fun”
After completing an inspection of my train for hand brakes, retainers and closed angle cocks, I stood at the last car in amazement about the size of the train. This was the longest and heaviest train that I had anything to do with. All night in the cab, the engineer and I talked about making it up the hill. We were not sure if we could make it over the hill but wanted to find out at least how far we would make it.
I walked into the cab and informed the engineer to back up when ready as I started to peel off my wet Carhart rain pants and coat.
“You have a lot of faith that I can get this train moving and up over the hill.”
I knew that we had only 40% of making it up the hill. This would be a battle of traction effort and adhesion versus wet rail and the grade. Our duo locomotives for the evening, a GP15-1 leading the second unit, a GP35 would combine for 98,000 pounds of traction effort, 28 EMD cylinders, and 4,000 horse power. The battle against the grade started.
We started the train in run 2 to get us moving quickly. One of the tracks leaving the scrap yard had a slight down-hill grade that gave us some help, but not that much. We crossed the first crossing with no problem and slipped some on the second crossing. We were moving, but it was not the horse power that kept us moving, it was all traction effort. There was no need yet to run the engine at full throttle since this would only cause the traction motors to slip and spin on the wet rail. The train had movement of about 7-8 mph and the only goal was to keep moving. All 31 cars were on the straight grade, engines in run 5 and would soon face an uphill curve in the track. This is where the horse power would come in to provide the power needed to maintain traction effort that would result in us still moving. We enter the curve and started to slip. These two locomotives were couple short hood to short hood which allowed me to see the wheel slip light reflection flashing from the trailing locomotive in my window. Rapidly, we started to loss speed once more cars enter the curve. In a finally assault at about 2 MPH, the engineer notched up the locos only to have them pull some and slip. This lasted only about 1 car length before we stalled in notch 8. We ended up cutting 6 cars off the head end and placing them on a siding that was less than a quarter mile away. While walking back to make the cut, I noticed that the air was filled with a very fine sand dust. This was the result of the sanders sanding the railing, then being crushed by the locomotive wheel and the traction motor blowers blowing it into the air. Pulling the remaining 25 cars was no problem. We soon tied the 25 to the 6 at the side track and headed home.
This night we failed because of adhesion, not horse power. You need power at speed to keep a train moving at track speed. In slow, hard pulls, it comes down to traction effort and adhesion.
Subscribe to:
Posts (Atom)